Why am I doing this?
The current workflow for data analysis and scientific computing in medical imaging requires the storage and processing of tens of millions of voxels per patient. Unfortunately, a personal PC/laptop is inadequate for such tasks.
What is CyVerse?
"OUR MISSION TO DESIGN, DEPLOY, AND EXPAND A NATIONAL CYBERINFRASTRUCTURE FOR LIFE SCIENCES RESEARCH, AND TO TRAIN SCIENTISTS IN ITS USE."
CyVerse is an NSF-funded multi-institutional project that aims to transform science through data-driven discovery.With this vision in mind, CyVerse offers several infrastructure solutions that are ideally suited for data analysis in Python. The ones relevant for this tutorial are:
- Atmosphere: Cloud computing platform for CyVerse
- Discovery Environment:manage data in the CyVerse Data Store
Steps
1. Create an account and log in to CyVerse
CyVerse offers free usage to its storage and computing infrastructure for academic user (you must have a *.edu email address), for this tutorial I am using my University of Arizona's email account account:
- Just go here to create an account
- You will receive an email to confirm the activation of your account
- Confirm the creation of your account and create a password.
- Log into CyVerse here
2. Request Access to Atmosphere
CyVerse offers access to only two services by default (Data Commons and Discovery Environment). In order to get access to your Atmosphere (assuming you are already log in):
Click on the AVAILABLE tab:

Click on the request access to Atmosphere button:

Once you do this you will have to explain how you will use it. My explanation was "Image Analysis".
2. Launch Atmosphere
Return to the services panel and click on the Launch Atmosphere button:

This will open a new tab in your browser. Confirm that the system did not log you out in the process, if it did log into CyVerse again in the new window .
3. Launch a New Instance inside Atmosphere
- Click on the Launch New Instance button:

If you completed the previous steps successfully, your screen should show now Atmosphere's Dashboard, indicating that you have used 0% of the resources allocated to you. An instance in this context is simply a virtual machine.
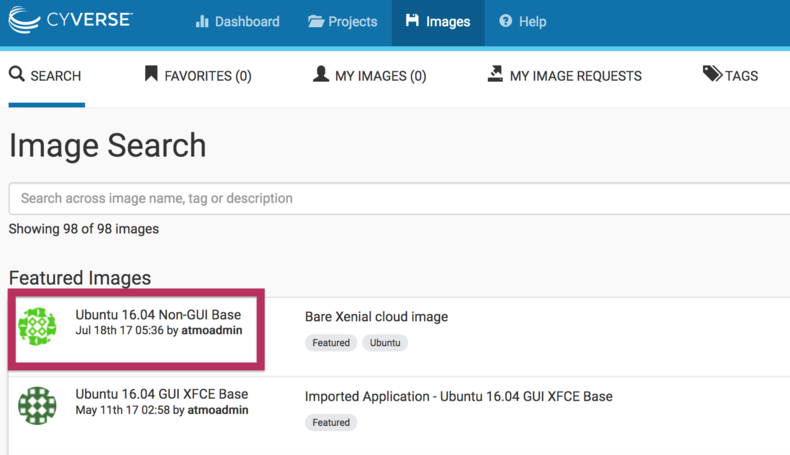
- Select Ubuntu 16.04 Non-GUI Base as your Instance:

- Launch Ubuntu 16.04 Non-GUI Base and complete the project information:
The previous step will take you to another page where you will indicate that you want to launch this instance. Because you have not created any project, the system will ask you to create a project and link this instance to that project.

4. Select the infrastructure you need and launch your instance (VM)
Once you selected and instance and linked it to a project, the next step is to decide what infrastructure is needed for your computing needs. For this tutorial I will keep the basic settings, but will change the name of my instance to learning-cyverse

5. Wait for Atmosphere to build your instance (VM)
CyVerse will take a few minutes to allocate all the resources needed to needed to create your instance. Once the process is done you will receive and email confirming the creation of your instance and more importantly, you will know know the IP address for your virtual machine. Your screen should look something like this one your instance is ready to be used:

The process you just followed is analogous to going to a store and buy a new computer (but free !!!), the next step is to install the software you need. For example you might want to use Python or C++ (God help you) for data analysis, data simulation, etc. In the next two posts in this series I explain how to
- [Setting up Python in Atmosphere (VM)]
- Using Python and Atmosphere (VM) for data analysis.
I am data scientist scientist, passionate about helping people using mathematics, programming and chemistry
